Trainees of the Oita Prefectural Bamboo Craft and Training Support Center will soon be holding their graduating exhibition. If you're in the Oita city area, please stop by to check out or buy our baskets. Details are as follows:
Date and Time: February 27 - 28 Place: Tokiwa Wasada Town, main hallway on the first floor
Feb. 27, 10AM - 8PM Feb. 28, 10AM - 5PM
Basic assignments (Kikuzoko basket and Sumitori kago) will be sold starting at 10 AM on both days.
Special assignments (18 unique bamboo products made by the trainees) will be displayed during the entire two days. Special assignments will be sold by reservation at 11AM on Saturday, and will be handed over to buyers at the end of the exhibition on Sunday. A lottery will be held when more than one buyer per basket is present.
We'll also have bamboo splitting demonstrations. Hope you can come!
In mid-January I put up a quick post and video about my experiences of cutting bamboo in the town of Naoiri to be used in my baskets. I'll go into a little more detail about that project in this post. (Scroll to the bottom to see the video.)
Caitlyn and I went with our friends, the Iida family, to visit Mr. Mikutsu on his farm in Naoiri, located in southern Oita prefecture. We've visited Naoiri before to harvest rice or dig up sweet potatoes as part of the local agricultural events planned by Mr. Mikutsu, but this time we went to cut down the bamboo growing in Mr. Mikutsu's own backyard. On the Mikutsu farm they raise beef cattle and grow vegetables and the like. Immediately behind their house is a mountain slope covered by tall cedar trees, under which they maintain their shiitake mushroom stands. Mr. Mikutsu hopes to expand the area of these stands next year, but growing tall and green in the large spaces between the cedar is bamboo. Mikutsu-san said I could use the bamboo if I like, since he would cut it down and pile it up to rot anyway, so we all decided to get together to cut it down and prepare it for temporary storage. It's a mutual cooperation like this that I imagine was so much more common in the olden days of Japan when farming was a major way of life. (Bamboo being seen by farmers or foresters as a nuisance in Japan, by the way, seems to be the general trend as bamboo is used less and less for the production of daily goods or other commercial products. As far as I know, in Oita prefecture at least there are several town revitalization projects that focus on trying to find ways to make use of the bamboo groves that are either not maintained or cut down and thrown away.)
I've used the word "bamboo" here so far without specifying type. There are over 600 varieties of bamboo in Japan, only a handful of which can be used to make baskets. At school we use only one variety, madake, otherwise known as giant timber bamboo, or, scientifically, Phyllostachys bambusoides, but hachiku (Phyllostachys nigra var. henonis) another timber bamboo almost exactly identical in appearance to madake is also usable. On the Mikutsu mountain I also found mosochiku, or Phyllostachys edulis, which is full of fiber and useful for some crafts, but is much coarser and less pliant than madake or hachiku. In Japan they're called the "big useful three (三大有用竹)," not only because they're the largest varieties, but also because they are naturally common and used so often in so many things. Luckily, the "nusiance" in this case was either hachiku or madake. You can tell the difference between these and moso by looking at the node. Moso (on the right) has one ring that sticks out, while madake or hachiku (on the left) has two rings. Supposedly it's practically impossible to pick out madake from hachiku just by looking at the two, so for now I'm satisfied with the observation that it's either one of them, both of which I can use.
So we all got together, and got to work. Mikutsu-san cut down the canes with a chainsaw (not my choice of tools, but farmers sure do know efficiency!) as the rest of us (even grandma and grandpa!) busily cut off the branches with hand saws and piled the culms together. After about an hour and a half of doing this we were finished clearing the area. I then chose the best looking bamboo, mostly by clearing out those that looked too old, worn, or damaged, and then we cut them all to about the same length, bound them in bundles of 4 or 5, and carried them off the mountain.
Knowing basically what kind of bamboo it is, the next question on my mind was how to prepare it for my baskets. The madake bamboo we use at school is never fresh--it's always cured through boiling and then dried in the sun for around a week. Uncured bamboo supposedly gets a little stiffer than cured bamboo even after it's dried, according to one of the veteran instructors at school. As long as I don't use Mikutsu's bamboo for extremely thin strips it shouldn't have any affect on my baskets. He also recommended storing the bamboo in a dry location where it wouldn't see direct sunlight. We found a perfect place in the rafters of the cow barn, where they'll be stored at least until school ends and I have time to work on my own baskets.
After a long, tiring morning of cutting and carrying, we all took a group photo and then made our way to the local ryokan, where we had a delicious meal of kiln-cooked rice (kama-meshi; 釜飯) and fried chicken, and then a soothing dip in a hot spring bath.
年齢と直径がばらばらの竹。20本はあったんだろう。一人で使いきれるか、ちょっと不安。My friend Akira and I piling up the bamboo before storing it. Only later when I split the bamboo will I find out how old, and therefore workable, each one is.
(左上から時計周りに)飯田亮、僕、御沓さん、ケイトリン、御沓さんのご両親、飯田友美、飯田佳祐。 (Clockwise from top-left) Akira Iida, me, Mr. Mikutsu, Caitlyn, Mr. Mikutsu's parents, Tomomi Iida, and little Keisuke.
Here's an article of me that appeared in the December 7th, 2009 morning edition of the Yomiuri Shimbun (Oita section, page 29), a national newspaper here in Japan. Click on the picture to get a larger image. English translation pending. Stay tuned!
I had a request recently to show bamboo being bent on a bending mold (what they call a himage-jigu, meaning "fire bending jig", here in Japan; 火曲げ治具)so here I'll go into a little more detail about how the bending mold is used to bend bamboo, and keep it that way. Once again, a picture of the mold we use at our school above. Shaped like a wedding cake, there are numerous tiers with different circumferences to bend the bamboo at tighter and tighter curves. Underneath this hollow wedding cake is a propane burner, which heats the jig from within. You can control the level of heat with the burner, but the jig is also made to release extraneous heat through an adjustable vent at the top.
Bending bamboo on the mold is both conceptually and technically a fairly simple procedure. At school there are specially made wooden wedges that fit in between the round central part and the arms that stick up. Wedges of varying thickness are on stock, but because most of the bamboo we bend at school is between 2-3 mm thick we almost always use the same wedges. You start by placing the end of the strip you are bending in between the central tier and the arm, and hammer in a wooden wedge between the strip and the arm, pressing the strip against the central tier and locking it in place. You bend the strip around the tier as far as the next arm, and hammer in another wedge (after the first wedge it's best to point the remaining wedges in the direction you are bending the strip, to keep the strip from floating away from the central tier, but my picture shows the opposite). You continue this at each arm until you get to the end of your strip. When bending strips to make rims, the strip will always double up on itself, in which case you have to bend the strip around in a slight spiral; this doesn't have much affect on the final product. Also, its best to bend a strip that's longer than the final strip's length, because bending the very ends of the strip is most difficult (in the picture I used the handle of the hammer to press the end of the strip against the mold). You measure the length of the strip you need before bending, and then cut off the extra ends after bending.
A couple other pointers about bending molds, or bending bamboo with heat in general:
Always use bamboo that's dry. Moisture keeps bamboo from setting after it's heated. Semi-dry bamboo will release moisture from the ends when bending it, which is usually a sign that it's being heated enough. Even days with high humidity can have an effect on how well bamboo retains its shape after molding.
It's easy to burn bamboo on a bending mold. Once the jig is warmed up or has been in use long enough, it only takes a minute or two to heat the bamboo enough to shape it.
As a basic rule, bend bamboo with the vascular bundles on the outside. When bending strips with the skin/vascular bundles on the inside, bend the strip more slowly, allowing the heat to soften the strip as you bend it, otherwise it could break (especially for thicker strips).
After the strip is molded, take it off the mold by hammering out the wedges. Bamboo that is still hot won't retain it's shape, so it's important either to hold the bamboo with gloved hands, or use another non-heated mold to keep it bent until it's cooled. At school we place the strips in tin containers roughly the same circumference as the final rim (see picture).
It's best to bend a strip more tightly (at a smaller diameter) than the curve it will be used for later. It's easier to unbend a strip without breaking than bend it more tightly after it was heated.
The bending mold we use at school is a rather complex piece of equipment that had cost the equivalent of several hundred dollars to have specially made. It's useful on an industrial scale, but remember that you don't need as fancy a device when making your own crafts at home. I've been successful bending 2.5 mm thick strips at home buy using a metal cake tin I bought at a 100-yen (1 dollar) store, screw-on clamps, and my kitchen stove. It takes a little longer but works just as well. Also, keep in mind that Japanese craftsmen long ago and some even today didn't/don't even use a round bending mold like this to make rims; they just rubbed the bamboo across their knees to soften and bend the bamboo enough to make a circle. Cutting the strip extra long before bending makes this method much easier.
I think that's about it. The process has become so natural to me by now that I can't think of anything else that might be worth mentioning. If you have any questions please leave a comment.
Happy New Year, everyone! It's hard to believe we're already in the start of a new decade. It still feels like the 2000s started not too long ago.
I've already notified my friends and family of this news (perhaps more thoroughly than they cared to listen), but thought because it's relevant to my current studies with bamboo I'd share it with a wider audience. Aside from my bamboo craft training, I've also been pursuing work as a freelance translator. I should say "aspiring" really, because to work as a freelance translator one must have extended prior experience in a given field, and because I only have two years of general translation experience through working with the Oita prefectural government as a CIR I don't receive many job requests. So, to validate my skills as a capable and qualified translator I did two things this past fall that one needn't do when you are receiving a consistent flow of translation requests: I entered in the Japan Association of Translators 6th Annual JAT Translation Competition for New and Aspiring Translators, and I took the "Environment" section of the 51st TQE, or Translator Qualifying Examination, a translation certification test run by SunFlare Academy, a translation/interpretation school and agency based in Tokyo. Results for the former were not as savory as the latter. I advanced to the finals of the JAT competition, only to fall out in the last judging. For the TQE, I passed Level 3, which is the lowest of 7 levels that one must qualify in order to pass the test as a whole, and be granted the ability to register oneself in SunFlare's agency as a practicing freelance translator. The test results, shown here in Japanese on their home page, say the percentage of those who passed was 9% (54 out of 594 test-takers), but what was most surprising to me was that none of those who passed the test made it beyond level 3. This is all great news for me, because it's a sign that I just might receive more orders for translation work in the near future, hopefully putting me on track to translate on a regular basis and make it a source of income to support myself as I also develop my skills in bamboo crafts. They're both challenging, time- and energy-consuming careers that are difficult or nearly impossible to jump start, but for me they inform each other in ways that would leave me feeling a little empty if I were to focus on just one of them. While I'm on the subject, even for new graduates of the bamboo craft school here in Beppu, making a living off one's newly acquired skills is extremely difficult. I don't remember the exact figures, but just a few years after graduation, what starts as 20 fresh bamboo craft practitioners often dwindles to about 3 or 4. There are many reasons for this; one is simply that one year of training is often too short a time to acquire the technical experience with enough breadth to be able to develop on one's own bamboo products that are creative and take advantage of a certain niche in the available market. Another reason is that the market itself is much smaller than it used to be a few decades ago. For these and other reasons, many of the new graduates take on part-time jobs unrelated to bamboo crafts to support themselves as they continue their studies and focus on learning a particular type of bamboo product. This is where translation work for me comes in. I'm hoping for the best on both fronts.
Now that I have a streak of free time on my hands due to this blesssed winter vacation, I'm trying to catch this blog up to what we're working on now. It's no easy task. We've completed 7 baskets so far, each within the span of about a month, and each basket incorporates such varying steps and techniques that it would take me weeks to describe and illustrate each in as much detail as I had the first two baskets. So I've decided first to present photos of each of the baskets in their completed states, each in a separate post, and then to add commentary to these posts later as I find the time to do so. I've dated each of these posts around the time we had finished the baskets in order to present them in their proper chronological order. To find the basket with the most recently added comments, just scroll down the page till you arrive at a basket that isn't just pictures. I've also added a list of the baskets on the right-hand column, so you can always easily go back to a basket you were reading about previously.
Three months and two baskets left in the school year. How time flies. I hope everyone has a happy new year. See you in 2010!
Recently, I went on a three-hour drive to a mountain town in northern Miyazaki prefecture called Hinokage to visit a bamboo craftsman who lives there. His name is Hiroshima Kazuo and he's a pretty famous figure in bamboo craft circles here in Japan. Now 94 years old, Hiroshima still lives by himself, and was mentally sharp, bright, and full of humor when we talked to him that day. The picture shows me and him sitting together, with Mr. Mike Okuma from the Oita Prefectural Bamboo Craft Training and Support Center on the far right, and Ms. Keiko Hirose, a former graduate of the center, on the far left (Kazutaka Kimiyama, also a former graduate, practicing basketmaker, and online retailer through his website http://www.takekago.com/, is taking the photograph). Some bamboo craft/basket enthusiasts may already know this, but some of Hiroshima-san's works were exhibited at Smithsonian's Arthur M. Sackler Gallery in 1995, and featured in a handsome book published under the same title as the exhibition, "A Basketmaker in Rural Japan." While poring over this and other publications, we talked with Hiroshiima san about his work. Because he lives in the deep mountain valleys of the Takachiho region of rural Kyushu, all of the baskets and other items he made were of the useful sort (contrasting with contemporary Beppu-style bamboo crafts, which run the gamut from useful and attractive to purely aesthetic and sculptural). He made household and agricultural tools and containers, sieves, trays, tools for silkworms and silk production, creels (fish and eel containers), fish, crab, and eel traps, and on and on. We talked a lot about the technical aspects of his products--what types of bamboo were used for them, their dimensions, etc.---which was an invaluable experience for me as an aspiring bamboo craftsman, but he often repeated this phrase that basically meant, "there's only so much I can express with words." He has over 60 years of bamboo craft experience after all. His workshop is a long room located in the front section of his house. The wall on one side has a small door for the long bamboo culms to fit through so he can slide them back and forth when he works. And the floor is sunken where he works so he can sit on the floor without having to fold his legs, something I now hope to have when I get settled making bamboo crafts somewhere someday.
Hiroshima's works will be on display until November 23rd at the Miyazaki Prefectural Museum of Nature and History in an exhibition titled 暮らしの中の竹と木, for anyone in the area who might have an opportunity to see them. Here is a link to Hinokage town's Bamboo Crafts Museum, where you can see more pictures of Hiroshima-san and his baskets. And lastly, you can read a full article about the 1995 Smithsonian exhibition at this website if you give information about your local library.
One step in its production that sets this basket apart from the first two baskets we made is that for this basket we "polished" (磨いた竹) all of the bamboo culms before processing them into strips or other parts. For the first two baskets, we used dried bamboo with the outermost skin still intact. In Japanese they refer to this as shiroi, or "white", bamboo, with products made from white bamboo being called shiromono (白物). While I'm on the topic, I'll add here that bamboo which is neither polished nor dried, and that still retains it's natural green color, is refered to as aoi, or "green", bamboo, with products made from green bamboo being referred to as aomono (青物). I make this distinction here because, while green bamboo products being called "green things" may seem too obvious an observation to be noteworthy, aomono are indeed a seperate breed of bamboo products in Japan, taking on different shapes and functions and fetching different market prices than their white counterparts.
By scraping off its skin, white bamboo reveals a slightly darker, caramel colored layer with obvious fiber lines. Polished bamboo is sometimes used as it is, but more often, and as is the case for this basket, it's dyed. In the general sense, white bamboo can't be dyed without polishing it, because its waxy outer layer repels dye. (The exception to this rule would be tanka-chiku and susudake;炭化竹; 煤竹.) At school we soaked our bamboo culms in water for a day to soften the outer skin and then scraped them with a curved, relatively dull plane called a migaki-sen (磨き銑; "polishing plane"). We then proceeded to make our strips the same way we made those for the previous baskets--by splitting the culms into strips of the desired width and thickness with our handheld knives (竹割り包丁).
Weaving
The title of this basket starts with "ajiro," which is a reference to the type of weave that this basket uses. In an ajiro weave the strips are pressed together to eliminating the spaces between them. As a matter of course the strips must be made rather thin, but exactly how thin depends on the type of ajiro. To construct the body of this basket we weaved strips less than 0.3 mm thick, and when weaving them each strip was made to pass over and under three perpendicular strips, hence the name of this particular ajiro, called san-bon-gen-ajiro (3本間網代; "three spaced ajiro") or san-bon-tobi-ajiro (3本飛び網代; "three jump ajiro"). You can probably imagine how this number effects how thick the strips should be. 2本間網代 would require thinner strips than 3本間網代, and 3thinner than 4.But it also depends on how wide the strips are, so we can only speak here in relative terms.
We weaved the strips into a big square, and then drew diagonal lines connecting the centers of each edge, marking the location where we would bend the weave to pull up what would become the walls of the basket. We used an electric iron with a flat pointed end, called a kote (コテ) in Japanese, to heat the bamboo and soften it, and then bent it upward past 90-degrees, and held it in that position till it cooled down. I supposed I held the kote on for too long, because I ended up burning the bamboo in some places, but this had no effect on the final product, which was to be dyed. The four walls were erected this way, and from there the basket's abdomen was constructed. Weaving from this point starts at the corners, where the same pattern--3 over 3 under--is continued without interruption. Once you get the hang of this weave it's very easy to get into a rhythm. You weave one circumference in one direction, completing one level, and then switch back and go in the opposite, working your way to the top as you go.
Allow me to finish describing the last stages of the Teppachi so we can move on to the next basket.
In the last post I closed by describing kata-jime, the step in which the strips are pressed together at the top to pinch the weave shut. From here the strips are interwoven to form a braided rim, called tomo-buchi (共縁), a name taken from the two characters meaning "together" and "rim." From the craftman's standpoint, the tomo-buchi is a brilliant way to make a rim because it doesn't require fashioning and attaching new bamboo material or tying such material with the more costly rattan--it's both time and cost effective (not to mention beautiful, as you will see).
The strips at this stage are comprised of two parts, those pointing leftward and those rightward. When braiding a tomo-buchi, strips pointing leftward are eventually arranged so that they overlap each other in proceeding order as the rightward-pointing strips are wrapped around them. The image above shows step 1 almost finished; the last five strips are to be wrapped around and inserted in holes in the lower weave so they stick outward. In step 2 (below), the strips are trimmed to an appropriate length and then tucked in the rim itself, ending the braid and creating a herringbone-like pattern.
With this, the body of the Teppachi is finished. All that remains is making and attaching a chikara-dake (力竹) to support the bottom side. The chikara-dake for this basket is a short, stubby piece whose material is taken from the thick-walled base-end of the madake culm. After splitting a tube into sticks, the sticks are soaked in water to soften them. The sticks are then whittled down to an appropriate thickness and their ends thinned with a kiri-dashi knife so they can fit snuggly between the wheel weave (rinko-ami, 輪弧編み) and the ajiro weave(網代編み).
History of the Teppachi Morikago It would be a waste to leave this section on the Teppachi without touching on the basket's history. The basket was originally designed by the first Living National Treasure to be designated in the bamboo arts (竹芸), Shono Shounsai, who grew up and lived in Beppu. Besides the more obvious aesthetic beauty of the basket's design, the basket is also a technically superb product because it uses all parts of the bamboo culm. Up to this point I haven't mentioned in any depth the structure of the bamboo culm and how its structure affects its application. In essence, however, two major elements greatly affect how each section of the madake culm is used in the Teppachi: 1) distance between the nodes, and 2) thickness of the walls between the nodes. (Girth, or culm diameter, is also an important factor in bamboo crafts, but because poles are categorized according girth from the point they are cut from the forest and through all steps of distribution, attaining the appropriate diameter pole is merely a matter of choosing the right diameter when purchasing; the Teppachi uses poles that are 6 to 7 centimeters in diameter.) Starting from the ground and moving skyward, the difference between nodes starts relatively short, expands towards the middle and gradually shortens again at the branches. Wall thickness follows a general and gradual change from thick (over a centimeter) at the base to thin (a few millimeters) at the branches. For the given size Teppachi we made at school, we were able to use any sections along the culm that, including one node, were greater than 52 centimeters in length for the body strips, and 80 centimeters for the hari-dowa (abdomen ring). This makes all of the culm usable except for the bottom 2 or 3 meters. This remaining section is applied to the bottom ajiro weave (底網代), which is made of short strips without nodes, and the chikara-dake, which utilizes the meatiest base area. Thus, from one whole madake pole one could make a couple Teppachi baskets (the number depending on the basket's intended size) and be left with only a small amount of extraneous material.
(Photo by David Ottinger)
The Teppachi experienced its heyday as a local product of Beppu in the two decades between the mid-1940s to the mid-1960s. It was made and sold as a souvenir gift for tourists who came to Beppu to bathe in its countless natural hotspring baths, often staying for weeks at a time to treat various bodily ailments in a form of medical treatment called toji (湯治). Sometimes the basket was sold containing the giant Zabon citrus, also a local product, or as a two- or three-piece set, called ireko (入れ子, "inserted child"), in which incrementally smaller sizes of the same basket nested in their larger counterparts. The type of weave for the basket bottom changed depending on its size; some consisted of a mutsume-ami adaptation called mutsume-kuzushi, or a simple square weave called yotsume-ami (四つ目編み). The size we learned to make at school, size 3, sold at the time for 100 yen. What was most surprising to me was learning that the quickest craftsmen were able to make 5 sets of three-piece ireko (a total of 15 baskets) all in one day! This is a sad fact to me considering I made 5 baskets in one month. From the 1960s onward, bamboo products were increasingly replaced by the plastic variety, putting out of business a lot of Beppu basket makers who had few other items in their repertoires with which to support themselves. The subversion of bamboo crafts by plastic products was a trend that occurred throughout Japan and is a theme that pops up in almost any account of the craft's recent history. It also seems to pose a huge barrier to any future expansion of the bamboo material and craft markets.
Tuesday this past week was Tanabata--7/7, the day when lovers unite. One of the students convinced the director to let us cut a bamboo tree and decorate it--a custom that up until a few decades ago was popular but isn't so much nowadays, so I hear. (See Tanabata Story and Customs on Wikipedia.) We each decorated the bamboo with our own rectangular strip of colored paper, called tanzaku (短冊). The wish I wrote on my paper was: 腰が素直に曲がるようになりますように, which means "I hope my hips become more flexible," in reference to the pain I experience daily from sitting cross-legged and in seiza all day. Some other students also decorated it with model balloons and other papers of different shapes. It's usually customary to float the entire thing down a river once Tanabata is over, or burn it, but our bamboo was drenched by the following day's rain and was disposed of soon thereafter. The whole practice of decorating a large plant with colorful ornaments and wishing for something reminded me of Christmas.
Rinko-awase輪弧合わせ Back to the Teppachi. So with all three separate parts prepared and ready--two wheel weaves (輪弧編み) and one diamond twill weave (桝網代) cut into a circle--we can now form the base and walls of the bowl. Before combining the two wheels, it's actually best to first even the spacing between the strips on each wheel so that the strips on one wheel fall pleasantly in line with the space between the strips on the other wheel. Once this is done, the circular twill weave is sandwiched between the two wheels, with a heavy weight placed on all three layers to keep their centers from straying. What follows is a rationally simple but technically complicated process of interweaving two wheels (rinko-awase, "combining wheels"), which have a total of 80 strips. The first two steps are the most confusing. The first is called pea-zukuri("making pairs", ペア作り) and the second is called pea-wake ("separating pairs", ペア分け). In the first step a strip from the bottom wheel is pulled up to meet with one of the strips on the top wheel so that each strip has a mate. On the diagram below, the blue arrow points to where a pair of strips (marked with red lines) are made. In the second step, the pairs are made to pass over one intersecting strip and then separated by weaving them under the next intersecting strips, but by staggering them (yellow arrow).
Once pairs are made and separated the rest of the weaving process is relatively simple, because at this point all 80 strips overlap each other and alternate regularly along the entire circumference. First, each strip is woven so that it passes over three intersecting strips and then goes under the fourth; this is called san-bontobi, or san-gen tobi ("jumping three strips", 3本飛び/3間飛び). This step is repeated, and is followed by four repetitions of ni-hon tobi (2本飛び). Once these steps are completed, the strips are pressed closer together and carefully arranged so the empty holes become nicely shaped diamonds.
Hari-dowa 張り胴輪の取り付け The six weaving steps I just described form the bottom to middle part of the bowl's body. The entire weave at this point naturally takes on a shallow funnel shape (top and bottom views shown above); it's more a plate than a bowl. Next, a belt-like loop called a hari-dowa("abdomen ring")--similar to the inner and outer rim of the MutsumeMorikagoand made the same way--is placed between the strips. This forces the strips to assume a tighter diameter, making them stand.
The strips, as you can see, weave themselves around the hari-dowa, in this case by skipping five strips (go-hon tobi, 5本飛び). The height of the hari-dowa should be the same at all points around the bowl--that is, if the strips were properly spaced before attaching it. After the hari-dowa is attached and go-hon tobicompleted, the strips are woven again through two ni-hon tobi and one san-bontobi, and the spacing evened. Finally, the shorter strips (moving diagonally from bottom right to top left) are pressed together at the top so that the spacing between them fades to zero, a procedure called kata-jime ("closing one side", 片締め). This will later become part of the bowl's rim, which I'll explain in the next post.
In early June we started our second basket: the teppachi morikago (鉄鉢盛かご), also known as teppatsu morikago. Teppachi (or teppatsu) means "iron bowl." The name comes from the iron bowl that Buddhist monks carry to receive alms of food or money. A Google image search for 鉄鉢 shows there are a variety of dimensions and materials now associated with the word, from practically spherical bowls (including glass light fixtures!), to more squat, tray-like dishes of ceramic or lacquer. Two traits they all seem to have in common are: 1) they have soft, curved edges, and 2) the bowl's lip is slightly contracted, with the bowl's maximum circumference usually located closer to the lip than the bottom. Here's a fun image of a raccoon dog (tanuki; 狸) holding a teppachi.
Rinko Ami 輪弧編み
Teppachi morikago come in numerous sizes, all of which are made to such precise dimension standards that they nest inside one another like Russian dolls. We are making one of the medium sized bowls, which consists of 80 weaving strips (編みひご), 2.5 mm wide by 0.55 mm thick--half in width and slightly thinner than the higo we used for the mutsume morikago. In the first step, 40 higo are weaved together in what's called a rinko-ami ("wheel weave"); in this weave, each strip is layered above or below the previous strip (depending on whether your eye is moving clockwise or counter-clockwise), with all the strips interlocked in such a way that they stay together once the wheel is complete. The series is started by inserting higo one-by-one into a five-prong, makeshift tool so that each strip overlaps two other higo. Once a chain of 40 is made, the last five strips are inserted in place of the five prongs, which are then removed, completing the circle. I should note that not all rinko-ami consist of 40 higo and not all use a five-prong tool; these variables seem to change greatly depending on the desired diameter of the wheel, higo size and number, etc. The completed wheel above is one we made for practice using 29 higo. In each teppachi bowl, two wheels are placed on top of each other and interlaced from the center outward, so the 29-higo wheels were important for learning the more complicated step of combining two wheels.
Ajiro-ami 網代編み The center of the rinko-ami--what for now is just a big gaping hole--will become the bowl's bottom, so a seperate circular piece is needed to fill it and support the bowl's contents. In this case we use twill weave or plaiting called ajiro-ami.There is an infinite variety of patterns that can be made from ajiro-ami based on how strips of different widths and colors are distributed in the weave. For our teppachi, we used undyed strips that are all the same width (7.0 mm wide by 0.6 mm thick). It just so happened that some of the bamboo I was working with had a particularly strong green hue, so I was able to cross green strips with the more ordinary ivory-colored strips, making its concentric square pattern--called masu-ajiro (桝網代)--stand out even more.
Once the strips are weaved and pressed together, a circle is drawn with a compass on the back. Wood glue is smeared along the line, enough so that once the circle is cut out its end pieces don't come undone.
In the next post I'll show how the circle twill plaiting is inserted between two wheels and how the wheels are interwoven as they climb up the walls of the bowl.
Here I share with English and Japanese speaking audiences my experiences as a 2009-2010 trainee of the Oita Prefectural Bamboo Craft and Training Support Center located in Beppu, Oita Prefecture, Japan. Feel free to post comments or questions!


 御沓さんという方は私の友達、飯田さんを経て知り合った方で、ずっと前から私が参加してきた稲刈りとか芋掘りの農業体験事業を企画・運営している方だ。行くたびに仲が親しくなっている感じがするが、今回は御沓さんの実家の裏山にある竹を伐りに行った。御沓さんの実家では野菜とか牛などいろいろな農産物を作っている。その中のひとつである椎茸の栽培面積を御沓さんは来年から伸ばしたいと考えているんだけど、杉の木の間に盛んに生えていて、邪魔になっているのが竹なのだ。御沓さんが「使ってくれんか」と言ってくれたのか、私の方から「使いたいんですけど」とお願いしたのか、よく覚えていないけど、邪魔になっているものが無駄なく使われることになるという出発点から、すごく気持ちのいい協力関係ができた。


 年齢と直径がばらばらの竹。20本はあったんだろう。一人で使いきれるか、ちょっと不安。My friend Akira and I piling up the bamboo before storing it. Only later when I split the bamboo will I find out how old, and therefore workable, each one is.
  (左上から時計周りに)飯田亮、僕、御沓さん、ケイトリン、御沓さんのご両親、飯田友美、飯田佳祐。
.jpg)
.jpg) I had a request recently to show bamboo being bent on a bending mold (what they call a himage-jigu, meaning "fire bending jig", here in Japan; 火曲げ治具)so here I'll go into a little more detail about how the bending mold is used to bend bamboo, and keep it that way. Once again, a picture of the mold we use at our school above. Shaped like a wedding cake, there are numerous tiers with different circumferences to bend the bamboo at tighter and tighter curves. Underneath this hollow wedding cake is a propane burner, which heats the jig from within. You can control the level of heat with the burner, but the jig is also made to release extraneous heat through an adjustable vent at the top.
I had a request recently to show bamboo being bent on a bending mold (what they call a himage-jigu, meaning "fire bending jig", here in Japan; 火曲げ治具)so here I'll go into a little more detail about how the bending mold is used to bend bamboo, and keep it that way. Once again, a picture of the mold we use at our school above. Shaped like a wedding cake, there are numerous tiers with different circumferences to bend the bamboo at tighter and tighter curves. Underneath this hollow wedding cake is a propane burner, which heats the jig from within. You can control the level of heat with the burner, but the jig is also made to release extraneous heat through an adjustable vent at the top..jpg)
.jpg)
.jpg)
.jpg) A couple other pointers about bending molds, or bending bamboo with heat in general:
A couple other pointers about bending molds, or bending bamboo with heat in general:.jpg)

 名刺入れの表は第3課題作(まだアップされていないが)のと同じ3本飛び網代(アジロ)という編みの生地になっていて、他の素材は手触りの柔らかい革になっている。僕がいただいたのは茶色だけど、この名詞入れは黒と茶色の2色あって、伝統工芸士の高江先生が店長の
.jpg)
.jpg)
.jpg)
.jpg)


.jpg)
.jpg)

.jpg)


.jpg)


.jpg)
 竹箍というと、もちろんたらい舟に限って使われているわけではなく、桶や樽にもよく見かけるもの(比較的小さい樽や桶ではねじ箍という形で)なのだが、それにも関わらず、水などを漏らさないという本来の役割がちゃんと果たせるものとしての竹箍が組める人の数は多くはないらしい。私が周囲に訪ねてみた結果、大分県内では、臼杵で樽を製作している庄司正博さんという方以外、近くに竹箍の技術を持っていらっしゃる職人さんはなかなかいないではないかということだった。
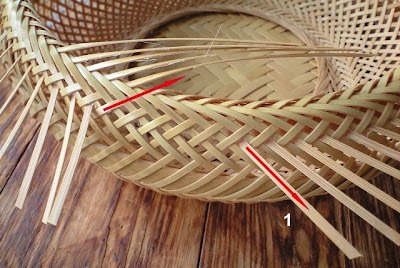 The strips at this stage are comprised of two parts, those pointing leftward and those rightward. When braiding a tomo-buchi, strips pointing leftward are eventually arranged so that they overlap each other in proceeding order as the rightward-pointing strips are wrapped around them. The image above shows step 1 almost finished; the last five strips are to be wrapped around and inserted in holes in the lower weave so they stick outward. In step 2 (below), the strips are trimmed to an appropriate length and then tucked in the rim itself, ending the braid and creating a herringbone-like pattern.
 With this, the body of the Teppachi is finished. All that remains is making and attaching a chikara-dake (力竹) to support the bottom side. The chikara-dake for this basket is a short, stubby piece whose material is taken from
 History of the Teppachi Morikago
 (Photo by David Ottinger)
 .jpg)
 Once pairs are made and separated the rest of the weaving process is relatively simple, because at this point all 80 strips overlap each other and alternate regularly along the entire
.jpg)
.jpg)
.jpg)
.jpg)

 The completed wheel above is one we made for practice using 29 higo. In each teppachi bowl, two wheels are placed on top of each other and interlaced from the center outward, so the 29-higo wheels were important for learning the more complicated step of combining two wheels.


 Posts
Posts


.jpg)


