皆さん、新年明けましておめでとうございます!良い年を迎えましたか?始まったばかりだから、まだ分からないって言っても当然だよね。
さて、去年(2009年はもう去年か)の秋、僕は竹工芸の勉強とは別に、将来フリーランスの翻訳者として働けるための地盤づくりみたいなことにも取り組んでいた。今までこんな話をしているのは初めてだから皆さん知らないと思うが、僕は大学時代から翻訳が好きで、今でもそれが本格的な仕事として出来るようにいろいろと試行錯誤をしているが、一昨年まで大分県に務めた2年間の実務経験を別にすれば、報酬をもらいながらの翻訳の仕事を請けたことは今のところまだ少ない。フリーランス翻訳の業界では、実績というのが非常に重要で、つまり過去にその仕事をした経験があること自体が次の仕事の受注につながっていく、というとても新規の翻訳者として入りにくい状況になっている。僕はそういう大きな壁みたいなものに直面している段階にある。かといって、竹もあるから竹一本でやってもいいんじゃないか、と思われる方もいらっしゃるかもしれないが、そううまく行ったらいいんだけど、竹工芸もそれだけで食べていくのもかなり厳しい職業であるという風に聞いている。正確な数字は覚えていないけど、竹センターを卒業した人でも20人だった人数が数年後に3,4人の現役者になったりとか。それだけ竹製品の市場が昔と比べたら縮小しているし、よっぽど技術が高くて魅力のあふれる商品・作品を作っていないと食べていけないというのが実情。なので、ちょっと前置きが長くなっているけど、ちゃんと収入を得ながらの翻訳の仕事ができるようになったら、それが竹工芸に励むための支えにもなってくれるだろうとの考えが去年の秋のこの二つのことに取り組もうと思った動機付けだった。
では、僕は何をしたかというと、9月にはJAT日本翻訳者協会の第6回新人者翻訳コンテスト、そして10月にはTQE翻訳実務検定にチャレンジしてみたんだ。その結果、まず翻訳コンテストなんだけど、日英部門(提示された文章を日本語から英語に訳す部門)で5人の最終候補者まで進んだが、最終審査で落ちてしまった。これは12月25日に日本翻訳者協会のHPで発表されたもので、そして題でも示唆した悔しいニュースのことだ。まあ、それはよしじゃないけどよしとして、翻訳実務検定のことはと言うと、これも日英翻訳で、僕がたくさんの分野から選んだのが環境分野。二酸化炭素の回収・貯留技術についての長~い原稿を訳して提出してみたところ、3級に合格!という結果になった。たかが3級かと思われるかもしれないが、3級から1級までが合格と見なされていて、そして今回の試験の受験データをみてみると、合格者には1、2級に合格した者は一人もいない。ということで、文字通りの嬉しいニュースとして僕は受け止めている。じゃあ、これで無事仕事が出来るようになったのかというと、それはまだ分からないが、頑張ってみた甲斐があったことは言うまでもない。翻訳の仕事が入り出しつつ、最後の課題の制作作業を進められるといいんだけどな~。
Happy New Year, everyone! It's hard to believe we're already in the start of a new decade. It still feels like the 2000s started not too long ago.
I've already notified my friends and family of this news (perhaps more thoroughly than they cared to listen), but thought because it's relevant to my current studies with bamboo I'd share it with a wider audience. Aside from my bamboo craft training, I've also been pursuing work as a freelance translator. I should say "aspiring" really, because to work as a freelance translator one must have extended prior experience in a given field, and because I only have two years of general translation experience through working with the Oita prefectural government as a CIR I don't receive many job requests. So, to validate my skills as a capable and qualified translator I did two things this past fall that one needn't do when you are receiving a consistent flow of translation requests: I entered in the Japan Association of Translators 6th Annual JAT Translation Competition for New and Aspiring Translators, and I took the "Environment" section of the 51st TQE, or Translator Qualifying Examination, a translation certification test run by SunFlare Academy, a translation/interpretation school and agency based in Tokyo. Results for the former were not as savory as the latter. I advanced to the finals of the JAT competition, only to fall out in the last judging. For the TQE, I passed Level 3, which is the lowest of 7 levels that one must qualify in order to pass the test as a whole, and be granted the ability to register oneself in SunFlare's agency as a practicing freelance translator. The test results, shown here in Japanese on their home page, say the percentage of those who passed was 9% (54 out of 594 test-takers), but what was most surprising to me was that none of those who passed the test made it beyond level 3. This is all great news for me, because it's a sign that I just might receive more orders for translation work in the near future, hopefully putting me on track to translate on a regular basis and make it a source of income to support myself as I also develop my skills in bamboo crafts. They're both challenging, time- and energy-consuming careers that are difficult or nearly impossible to jump start, but for me they inform each other in ways that would leave me feeling a little empty if I were to focus on just one of them. While I'm on the subject, even for new graduates of the bamboo craft school here in Beppu, making a living off one's newly acquired skills is extremely difficult. I don't remember the exact figures, but just a few years after graduation, what starts as 20 fresh bamboo craft practitioners often dwindles to about 3 or 4. There are many reasons for this; one is simply that one year of training is often too short a time to acquire the technical experience with enough breadth to be able to develop on one's own bamboo products that are creative and take advantage of a certain niche in the available market. Another reason is that the market itself is much smaller than it used to be a few decades ago. For these and other reasons, many of the new graduates take on part-time jobs unrelated to bamboo crafts to support themselves as they continue their studies and focus on learning a particular type of bamboo product. This is where translation work for me comes in. I'm hoping for the best on both fronts.
Wednesday, December 30, 2009
Tuesday, December 29, 2009
Note on Blog Updates ブログの更新について
皆さん、年末はいかがお過ごしでしょうか?
僕はやっと手に入ったこの自由な時間を使って、延び延びになっていた基本課題作のポストをたくさん書こうとしている。なかなか今学校でやっていることに追いつくのが難しいので、とりあえず課題作の完成した状態の写真をそれぞれ一個ずつのポストに貼っておくことにしてみた。後で時間が取れ次第、その製作過程についてのもっと詳しいことを追加する。あと、ポストの日付なんだけど、まるで作品が終わった時と合わせてポストをアップしたかのように、過去を遡ってポストを掲載させてもらった。従って、ポストの順番は課題作の順番そのままになっている。この誤魔化しをお許しください。最近の記述を探すのには記述があるところまで下方へスクロールすればいいというわけなんだけど、それと関係なく読みたい籠がある場合は(例えば:Ajiro Ichirin-sashi)、右側にあるレベル集からそれを選択してください。
常にもっともっと充実にしたいと思っているこのブログ。来年は、訓練とバイトとの合間の時間をよりうまく捕まえて、日本語のポストもより多く書くように、一生懸命がんばります。
皆さん、良いお年をお迎えください。
Now that I have a streak of free time on my hands due to this blesssed winter vacation, I'm trying to catch this blog up to what we're working on now. It's no easy task. We've completed 7 baskets so far, each within the span of about a month, and each basket incorporates such varying steps and techniques that it would take me weeks to describe and illustrate each in as much detail as I had the first two baskets. So I've decided first to present photos of each of the baskets in their completed states, each in a separate post, and then to add commentary to these posts later as I find the time to do so. I've dated each of these posts around the time we had finished the baskets in order to present them in their proper chronological order. To find the basket with the most recently added comments, just scroll down the page till you arrive at a basket that isn't just pictures. I've also added a list of the baskets on the right-hand column, so you can always easily go back to a basket you were reading about previously.
Three months and two baskets left in the school year. How time flies. I hope everyone has a happy new year. See you in 2010!
Sunday, December 6, 2009
網代編みの名刺入れGET!
ちょうど一週間前の後継者育成事業の打ち上げで、ビンゴで7位になったにも関わらず、景品一等の名詞入れをGETしちゃった。(別府竹製品協同組合が主催の後継者育成事業については後日のポストにコメントするつもり。)ここでその商品と、打ち上げの主催者の高江雅人先生について紹介しておこう。

 名刺入れの表は第3課題作(まだアップされていないが)のと同じ3本飛び網代(アジロ)という編みの生地になっていて、他の素材は手触りの柔らかい革になっている。僕がいただいたのは茶色だけど、この名詞入れは黒と茶色の2色あって、伝統工芸士の高江先生が店長のオンセのホームページからも注文できる商品。オンセは大分県安心院(あじむ)町にある竹工芸の工房であって、多くの竹工芸訓練支援センターの卒業生にとって有力(有望?)の就職先になってきたところ。ちなみに、高江先生もブログをやっていらっしゃるので、この打ち上げのポストなどをご覧になりたい方はこちらへ。
僕はまだ訓練中なので名詞なんかありゃしない。せっかくいただいた名刺入れ。まず出世しないと!
高江先生ありがとう!!!
名刺入れの表は第3課題作(まだアップされていないが)のと同じ3本飛び網代(アジロ)という編みの生地になっていて、他の素材は手触りの柔らかい革になっている。僕がいただいたのは茶色だけど、この名詞入れは黒と茶色の2色あって、伝統工芸士の高江先生が店長のオンセのホームページからも注文できる商品。オンセは大分県安心院(あじむ)町にある竹工芸の工房であって、多くの竹工芸訓練支援センターの卒業生にとって有力(有望?)の就職先になってきたところ。ちなみに、高江先生もブログをやっていらっしゃるので、この打ち上げのポストなどをご覧になりたい方はこちらへ。僕はまだ訓練中なので名詞なんかありゃしない。せっかくいただいた名刺入れ。まず出世しないと!
高江先生ありがとう!!!
Tuesday, December 1, 2009
.jpg)
.jpg)
.jpg)
Tuesday, November 3, 2009
Trip to Hinokage Town
Recently, I went on a three-hour drive to a mountain town in northern Miyazaki prefecture called Hinokage to visit a bamboo craftsman who lives there. His name is Hiroshima Kazuo and he's a pretty famous figure in bamboo craft circles here in Japan. Now 94 years old, Hiroshima still lives by himself, and was mentally sharp, bright, and full of humor when we talked to him that day. The picture shows me and him sitting together, with Mr. Mike Okuma from the Oita Prefectural Bamboo Craft Training and Support Center on the far right, and Ms. Keiko Hirose, a former graduate of the center, on the far left (Kazutaka Kimiyama, also a former graduate, practicing basketmaker, and online retailer through his website http://www.takekago.com/, is taking the photograph). Some bamboo craft/basket enthusiasts may already know this, but some of Hir
Hiroshima's works will be on display until November 23rd at the Miyazaki Prefectural Museum of Nature and History in an exhibition titled 暮らしの中の竹と木, for anyone in the area who might have an opportunity to see them. Here is a link to Hinokage town's Bamboo Crafts Museum, where you can see more pictures of Hiroshima-san and his baskets. And lastly, you can read a full article about the 1995 Smithsonian exhibition at this website if you give information about your local library.
Sunday, November 1, 2009
.jpg)
.jpg)
Thursday, October 1, 2009

Tuesday, September 1, 2009
Basket #3: Ajiro Ichirin-sashi
.jpg) 網代一輪挿し
網代一輪挿し First Step: Polishing
One step in its production that sets this basket apart from the first two baskets we made is that for this basket we "polished" (磨いた竹) all of the bamboo culms before processing them into strips or other parts. For the first two baskets, we used dried bamboo with the outermost skin still intact. In Japanese they refer to this as shiroi, or "white", bamboo, with products made from white bamboo being called shiromono (白物). While I'm on the topic, I'll add here that bamboo which is neither polished nor dried, and that still retains it's natural green color, is refered to as aoi, or "green", bamboo, with products made from green bamboo being referred to as aomono (青物). I make this distinction here because, while green bamboo products being called "green things" may seem too obvious an observation to be noteworthy, aomono are indeed a seperate breed of bamboo products in Japan, taking on different shapes and functions and fetching different market prices than their white counterparts.
By scraping off its skin, white bamboo reveals a slightly darker, caramel colored layer with obvious fiber lines. Polished bamboo is sometimes used as it is, but more often, and as is the case for this basket, it's dyed. In the general sense, white bamboo can't be dyed without polishing it, because its waxy outer layer repels dye. (The exception to this rule would be tanka-chiku and susudake; 炭化竹; 煤竹.) At school we soaked our bamboo culms in water for a day to soften the outer skin and then scraped them with a curved, relatively dull plane called a migaki-sen (磨き銑; "polishing plane"). We then proceeded to make our strips the same way we made those for the previous baskets--by splitting the culms into strips of the desired width and thickness with our handheld knives (竹割り包丁).
Weaving

The title of this basket starts with "ajiro," which is a reference to the type of weave that this basket uses. In an ajiro weave the strips are pressed together to eliminating the spaces between them. As a matter of course the strips must be made rather thin, but exactly how thin depends on the type of ajiro. To construct the body of this basket we weaved strips less than 0.3 mm thick, and when weaving them each strip was made to pass over and under three perpendicular strips, hence the name of this particular ajiro, called san-bon-gen-ajiro (3本間網代; "three spaced ajiro") or san-bon-tobi-ajiro (3本飛び網代; "three jump ajiro"). You can probably imagine how this number effects how thick the strips should be. 2本間網代 would require thinner strips than 3本間網代, and 3thinner than 4.But it also depends on how wide the strips are, so we can only speak here in relative terms.
.jpg) We weaved the strips into a big square, and then drew diagonal lines connecting the centers of each edge, marking the location where we would bend the weave to pull up what would become the walls of the basket. We used an electric iron with a flat pointed end, called a kote (コテ) in Japanese, to heat the bamboo and soften it, and then bent it upward past 90-degrees, and held it in that position till it cooled down. I supposed I held the kote on for too long, because I ended up burning the bamboo in some places, but this had no effect on the final product, which was to be dyed. The four walls were erected this way, and from there the basket's abdomen was constructed. Weaving from this point starts at the corners, where the same pattern--3 over 3 under--is continued without interruption. Once you get the hang of this weave it's very easy to get into a rhythm. You weave one circumference in one direction, completing one level, and then switch back and go in the opposite, working your way to the top as you go.
We weaved the strips into a big square, and then drew diagonal lines connecting the centers of each edge, marking the location where we would bend the weave to pull up what would become the walls of the basket. We used an electric iron with a flat pointed end, called a kote (コテ) in Japanese, to heat the bamboo and soften it, and then bent it upward past 90-degrees, and held it in that position till it cooled down. I supposed I held the kote on for too long, because I ended up burning the bamboo in some places, but this had no effect on the final product, which was to be dyed. The four walls were erected this way, and from there the basket's abdomen was constructed. Weaving from this point starts at the corners, where the same pattern--3 over 3 under--is continued without interruption. Once you get the hang of this weave it's very easy to get into a rhythm. You weave one circumference in one direction, completing one level, and then switch back and go in the opposite, working your way to the top as you go. Monday, August 31, 2009
マダケと竹箍の技術 (写真、内容追加)
今までのと違った内容のポスト、しかも長い空白の時間の後で申し訳ないけど、ここで皆さんに紹介したい人物がいる。アメリカで船大工をし、伝統的な和船の一つである「たらい舟」を製作している、アメリカ人のダグラス・ブルックスさん(Douglas Brooks)である。
 HPにご覧になれるように、ブルックスさんの作るたらい舟には竹箍(たけたが)という部分がある。この竹箍は実はマダケで作っているんだということに私の興味が湧いたのをきっかけに、このブログにもちょっと取り上げてみようかなと思ったのだ。
ものすごく当然なことだけど、日本では竹は材料として数えきれないたくさんのモノに使われている。私は今年の春に竹工芸に携わりだしてからというもの、さりげなく使っていた、あるいは日常的に見かけていた様々なものが、実は竹が素材なのだということにどんどん気付いて、これもかという感じでその数と種類に圧倒されている。竹製品があまりない(あってもそれと他の天然材料とを見分ける目がなかなか育たない)アメリカを母国とする私が、なぜこんな肝心なところを見落としてきたのか、すごく不思議に思っている。一般論としての話だけど、日本に滞在する外国人を、何か日本社会・文化の本質的なところが見抜ける能力の持ち主とする話を私は時々聞くが、私自身の観察力といえば逆にすごく鈍いというか、乏しいんだろうなと思うことも多くなってきた。竹を割るなり剥ぐなりこの手で接触しているうちに竹の本質が分かってきているように、まだ経験が浅い、あるいは全くない世界というのはどれだけあるのか、自分が小ちゃくなるのが感じられる。
いずれにせよ、私が竹に目覚めていくそういう過程の中で、このブルックスさんの竹箍もまた意外な発見のように感じられた。理由は二つあると思うけど、一つ目は生産量日本一ということで有名な大分県のマダケが遠い新潟でも昔からの工芸品の構造に取り入れられているということ。つまり、言い換えれば、私がマダケという種類の竹を知ったのは前述したようについ最近のことなのだけど、どれほど広く使われている竹なのかは少しずつしか分かってきていないので、たらい舟の竹箍もマダケだということは私にとってすごく興味深かった。それから、もう一つの理由は、ブルックスさん本人はもちろん外国人だが、外国人でありながら日本の伝統工芸の技術を自分のものにし、そして現在その継承、発信などに積極的に励まれている、ということ。つまり、私が今年歩み始めたばかりの同じ進路であって、ブルックさんは私にとってのいわゆる見本の人物像のような人間である。ブルックスさんの活動から見習えるものがきっとたくさんあるんだろうなと思いながら、竹箍というものを見ているのである。
 では、もっと具体的な話をすると、このたらい舟の竹箍は組み箍といって、長さ14m弱のマダケ4本で構成されており、4本とも大きな輪に編んだものが舟の本体に叩くようにしてはめられていく。竹はまず四つ割にして、それから大きな輪に組んでいくんだけど、その組む作業の補助として使う道具は組棒(くみぼう)というらしい(写真参照)。ブルックスさんの先生、藤井こういちさんが箍を組んでいるところ、そして出来上がったところが写真に見られるが、ご覧の通りその直径はかなり大きい。たらい舟の上の直径と下の直径とが若干違うので、その長さも正確でないとうまくはまらないのだそうだ。(たらい舟の製作風景の写真。)現在たらい舟の竹箍が組める人は、藤井先生が10年前に亡くなられて以来、ブルックスさんだけになってしまっているので、たらい舟の竹箍の技術継承はかなり厳しい状況に置かれていると言えよう。
.jpg)
 竹箍というと、もちろんたらい舟に限って使われているわけではなく、桶や樽にもよく見かけるもの(比較的小さい樽や桶ではねじ箍という形で)なのだが、それにも関わらず、水などを漏らさないという本来の役割がちゃんと果たせるものとしての竹箍が組める人の数は多くはないらしい。私が周囲に訪ねてみた結果、大分県内では、臼杵で樽を製作している庄司正博さんという方以外、近くに竹箍の技術を持っていらっしゃる職人さんはなかなかいないではないかということだった。
もう竹箍については最後になったけど、佐渡のたらい舟とブルックスさんの活動についてもっと知りたい人は、ブルックスさんの本、『佐渡のたらい舟—職人の技法』を読むことをお勧めする。あと、もし興味のある方が相当人数でいらっしゃれば、竹箍のワークショップを行ってみたいとブルックスさんは言っている(もちろん、ブルックスさんの次回の来日のついでに)。マダケを豊富に使っている大分県の職人さんなどにとって、マダケのもうひとつの活用方法を知るいい機会になるではないかと思う。
以上のことについてご意見などあったら、是非コメントを書いていただくか、ご連絡をいただけると嬉しい。
 HPにご覧になれるように、ブルックスさんの作るたらい舟には竹箍(たけたが)という部分がある。この竹箍は実はマダケで作っているんだということに私の興味が湧いたのをきっかけに、このブログにもちょっと取り上げてみようかなと思ったのだ。
いずれにせよ、私が竹に目覚めていくそういう過程の中で、このブルックスさんの竹箍もまた意外な発見のように感じられた。理由は二つあると思うけど、一つ目は生産量日本一ということで有名な大分県のマダケが遠い新潟でも昔からの工芸品の構造に取り入れられているということ。つまり、言い換えれば、私がマダケという種類の竹を知ったのは前述したようについ最近のことなのだけど、どれほど広く使われている竹なのかは少しずつしか分かってきていないので、たらい舟の竹箍もマダケだということは私にとってすごく興味深かった。それから、もう一つの理由は、ブルックスさん本人はもちろん外国人だが、外国人でありながら日本の伝統工芸の技術を自分のものにし、そして現在その継承、発信などに積極的に励まれている、ということ。つまり、私が今年歩み始めたばかりの同じ進路であって、ブルックさんは私にとってのいわゆる見本の人物像のような人間である。ブルックスさんの活動から見習えるものがきっとたくさんあるんだろうなと思いながら、竹箍というものを見ているのである。
 では、もっと具体的な話をすると、このたらい舟の竹箍は組み箍といって、長さ14m弱のマダケ4本で構成されており、4本とも大きな輪に編んだものが舟の本体に叩くようにしてはめられていく。竹はまず四つ割にして、それから大きな輪に組んでいくんだけど、その組む作業の補助として使う道具は組棒(くみぼう)というらしい(写真参照)。ブルックスさんの先生、藤井こういちさんが箍を組んでいるところ、そして出来上がったところが写真に見られるが、ご覧の通りその直径はかなり大きい。たらい舟の上の直径と下の直径とが若干違うので、その長さも正確でないとうまくはまらないのだそうだ。(たらい舟の製作風景の写真。)現在たらい舟の竹箍が組める人は、藤井先生が10年前に亡くなられて以来、ブルックスさんだけになってしまっているので、たらい舟の竹箍の技術継承はかなり厳しい状況に置かれていると言えよう。 竹箍というと、もちろんたらい舟に限って使われているわけではなく、桶や樽にもよく見かけるもの(比較的小さい樽や桶ではねじ箍という形で)なのだが、それにも関わらず、水などを漏らさないという本来の役割がちゃんと果たせるものとしての竹箍が組める人の数は多くはないらしい。私が周囲に訪ねてみた結果、大分県内では、臼杵で樽を製作している庄司正博さんという方以外、近くに竹箍の技術を持っていらっしゃる職人さんはなかなかいないではないかということだった。
もう竹箍については最後になったけど、佐渡のたらい舟とブルックスさんの活動についてもっと知りたい人は、ブルックスさんの本、『佐渡のたらい舟—職人の技法』を読むことをお勧めする。あと、もし興味のある方が相当人数でいらっしゃれば、竹箍のワークショップを行ってみたいとブルックスさんは言っている(もちろん、ブルックスさんの次回の来日のついでに)。マダケを豊富に使っている大分県の職人さんなどにとって、マダケのもうひとつの活用方法を知るいい機会になるではないかと思う。
以上のことについてご意見などあったら、是非コメントを書いていただくか、ご連絡をいただけると嬉しい。
Saturday, August 29, 2009
Teppachi Morikago Part 3: Final Steps
Allow me to finish describing the last stages of the Teppachi so we can move on to the next basket.
In the last post I closed by describing kata-jime, the step in which the strips are pressed together at the top to pinch the weave shut. From here the strips are interwoven to form a braided rim, called tomo-buchi (共縁), a name taken from the two characters meaning "together" and "rim." From the craftman's standpoint, the tomo-buchi is a brilliant way to make a rim because it doesn't require fashioning and attaching new bamboo material or tying such material with the more costly rattan--it's both time and cost effective (not to mention beautiful, as you will see).
 The strips at this stage are comprised of two parts, those pointing leftward and those rightward. When braiding a tomo-buchi, strips pointing leftward are eventually arranged so that they overlap each other in proceeding order as the rightward-pointing strips are wrapped around them. The image above shows step 1 almost finished; the last five strips are to be wrapped around and inserted in holes in the lower weave so they stick outward. In step 2 (below), the strips are trimmed to an appropriate length and then tucked in the rim itself, ending the braid and creating a herringbone-like pattern.
 With this, the body of the Teppachi is finished. All that remains is making and attaching a chikara-dake (力竹) to support the bottom side. The chikara-dake for this basket is a short, stubby piece whose material is taken from
 the thick-walled base-end of the madake culm. After splitting a tube into sticks, the sticks are soaked in water to soften them. The sticks are then whittled down to an appropriate thickness and their ends thinned with a kiri-dashi knife so they can fit snuggly between the wheel weave (rinko-ami, 輪弧編み) and the ajiro weave (網代編み).
 History of the Teppachi Morikago
It would be a waste to leave this section on the Teppachi without touching on the basket's history. The basket was originally designed by the first Living National Treasure to be designated in the bamboo arts (竹芸), Shono Shounsai, who grew up and lived in Beppu. Besides the more obvious aesthetic beauty of the basket's design, the basket is also a technically superb product because it uses all parts of the bamboo culm. Up to this point I haven't mentioned in any depth the structure of the bamboo culm and how its structure affects its application. In essence, however, two major elements greatly affect how each section of the madake culm is used in the Teppachi: 1) distance between the nodes, and 2) thickness of the walls between the nodes. (Girth, or culm diameter, is also an important factor in bamboo crafts, but because poles are categorized according girth from the point they are cut from the forest and through all steps of distribution, attaining the appropriate diameter pole is merely a matter of choosing the right diameter when purchasing; the Teppachi uses poles that are 6 to 7 centimeters in diameter.) Starting from the ground and moving skyward, the difference between nodes starts relatively short, expands towards the middle and gradually shortens again at the branches. Wall thickness follows a general and gradual change from thick (over a centimeter) at the base to thin (a few millimeters) at the branches. For the given size Teppachi we made at school, we were able to use any sections along the culm that, including one node, were greater than 52 centimeters in length for the body strips, and 80 centimeters for the hari-dowa (abdomen ring). This makes all of the culm usable except for the bottom 2 or 3 meters. This remaining section is applied to the bottom ajiro weave (底網代), which is made of short strips without nodes, and the chikara-dake, which utilizes the meatiest base area. Thus, from one whole madake pole one could make a couple Teppachi baskets (the number depending on the basket's intended size) and be left with only a small amount of extraneous material. (Photo by David Ottinger)
The Teppachi experienced its heyday as a local product of Beppu in the two decades between the mid-1940s to the mid-1960s. It was made and sold as a souvenir gift for tourists who came to Beppu to bathe in its countless natural hotspring baths, often staying for weeks at a time to treat various bodily ailments in a form of medical treatment called toji (湯治). Sometimes the basket was sold containing the giant Zabon citrus, also a local product, or as a two- or three-piece set, called ireko (入れ子, "inserted child"), in which incrementally smaller sizes of the same basket nested in their larger counterparts. The type of weave for the basket bottom changed depending on its size; some consisted of a mutsume-ami adaptation called mutsume-kuzushi, or a simple square weave called yotsume-ami (四つ目編み). The size we learned to make at school, size 3, sold at the time for 100 yen. What was most surprising to me was learning that the quickest craftsmen were able to make 5 sets of three-piece ireko (a total of 15 baskets) all in one day! This is a sad fact to me considering I made 5 baskets in one month. From the 1960s onward, bamboo products were increasingly replaced by the plastic variety, putting out of business a lot of Beppu basket makers who had few other items in their repertoires with which to support themselves. The subversion of bamboo crafts by plastic products was a trend that occurred throughout Japan and is a theme that pops up in almost any account of the craft's recent history. It also seems to pose a huge barrier to any future expansion of the bamboo material and craft markets.
Saturday, July 11, 2009
Teppachi Morikago: Part 2
.jpg) Tuesday this past week was Tanabata--7/7, the day when lovers unite. One of the students convinced the director to let us cut a bamboo tree and decorate it--a custom that up until a few decades ago was popular but isn't so much nowadays, so I hear. (See Tanabata Story and Customs on Wikipedia.) We each decorated the bamboo with our own rectangular strip of colored paper, called tanzaku (短冊). The wish I wrote on my paper was: 腰が素直に曲がるようになりますように, which means "I hope my hips become more flexible," in reference to the pain I experience daily from sitting cross-legged and in seiza all day. Some other students also decorated it with model balloons and other papers of different shapes. It's usually customary to float the entire thing down a river once Tanabata is over, or burn it, but our bamboo was drenched by the following day's rain and was disposed of soon thereafter. The whole practice of decorating a large plant with colorful ornaments and wishing for something reminded me of Christmas.
Tuesday this past week was Tanabata--7/7, the day when lovers unite. One of the students convinced the director to let us cut a bamboo tree and decorate it--a custom that up until a few decades ago was popular but isn't so much nowadays, so I hear. (See Tanabata Story and Customs on Wikipedia.) We each decorated the bamboo with our own rectangular strip of colored paper, called tanzaku (短冊). The wish I wrote on my paper was: 腰が素直に曲がるようになりますように, which means "I hope my hips become more flexible," in reference to the pain I experience daily from sitting cross-legged and in seiza all day. Some other students also decorated it with model balloons and other papers of different shapes. It's usually customary to float the entire thing down a river once Tanabata is over, or burn it, but our bamboo was drenched by the following day's rain and was disposed of soon thereafter. The whole practice of decorating a large plant with colorful ornaments and wishing for something reminded me of Christmas.Rinko-awase 輪弧合わせ
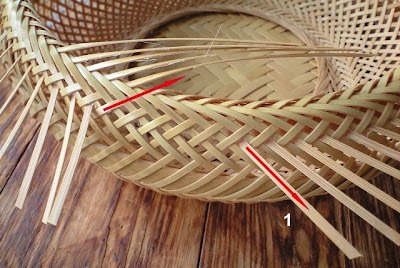
Back to the Teppachi. So with all three separate parts prepared and ready--two wheel weaves (輪弧編み) and one diamond twill weave (桝網代) cut into a circle--we can now form the base and walls of the bowl. Before combining the two wheels, it's actually best to first even the spacing between the strips on each wheel so that the strips on one wheel fall pleasantly in line with the space between the strips on the other wheel. Once this is done, the circular twill weave is sandwiched between the two wheels, with a heavy weight placed on all three layers to keep their centers from straying. What follows is a rationally simple but technically complicated process of interweaving two wheels (rinko-awase, "combining wheels"), which have a total of 80 strips. The first two steps are the most confusing. The first is called pea-zukuri ("making pairs", ペア作り) and the second is called pea-wake ("separating pairs", ペア分け). In the first step a strip from the bottom wheel is pulled up to meet with one of the strips on the top wheel so that each strip has a mate. On the diagram below, the blue arrow points to where a pair of strips (marked with red lines) are made. In the second step, the pairs are made to pass over one intersecting strip and then separated by weaving them under the next intersecting strips, but by staggering them (yellow arrow).
Back to the Teppachi. So with all three separate parts prepared and ready--two wheel weaves (輪弧編み) and one diamond twill weave (桝網代) cut into a circle--we can now form the base and walls of the bowl. Before combining the two wheels, it's actually best to first even the spacing between the strips on each wheel so that the strips on one wheel fall pleasantly in line with the space between the strips on the other wheel. Once this is done, the circular twill weave is sandwiched between the two wheels, with a heavy weight placed on all three layers to keep their centers from straying. What follows is a rationally simple but technically complicated process of interweaving two wheels (rinko-awase, "combining wheels"), which have a total of 80 strips. The first two steps are the most confusing. The first is called pea-zukuri ("making pairs", ペア作り) and the second is called pea-wake ("separating pairs", ペア分け). In the first step a strip from the bottom wheel is pulled up to meet with one of the strips on the top wheel so that each strip has a mate. On the diagram below, the blue arrow points to where a pair of strips (marked with red lines) are made. In the second step, the pairs are made to pass over one intersecting strip and then separated by weaving them under the next intersecting strips, but by staggering them (yellow arrow).
 Once pairs are made and separated the rest of the weaving process is relatively simple, because at this point all 80 strips overlap each other and alternate regularly along the entire circumference. First, each strip is woven so that it passes over three intersecting strips and then goes under the fourth; this is called san-bon tobi, or san-gen tobi ("jumping three strips", 3本飛び/3間飛び). This step is repeated, and is followed by four repetitions of ni-hon tobi (2本飛び). Once these steps are completed, the strips are pressed closer together and carefully arranged so the empty holes become nicely shaped diamonds.
.jpg)
.jpg)
Hari-dowa 張り胴輪の取り付け
The six weaving steps I just described form the bottom to middle part of the bowl's body. The entire weave at this point naturally takes on a shallow funnel shape (top and bottom views shown above); it's more a plate than a bowl. Next, a belt-like loop called a hari-dowa ("abdomen ring")--similar to the inner and outer rim of the Mutsume Morikago and made the same way--is placed between the strips. This forces the strips to assume a tighter diameter, making them stand.
.jpg)
The strips, as you can see, weave themselves around the hari-dowa, in this case by skipping five strips (go-hon tobi, 5本飛び). The height of the hari-dowa should be the same at all points around the bowl--that is, if the strips were properly spaced before attaching it. After the hari-dowa is attached and go-hon tobi completed, the strips are woven again through two ni-hon tobi and one san-bon tobi, and the spacing evened. Finally, the shorter strips (moving diagonally from bottom right to top left) are pressed together at the top so that the spacing between them fades to zero, a procedure called kata-jime ("closing one side", 片締め). This will later become part of the bowl's rim, which I'll explain in the next post.
.jpg)
Saturday, June 27, 2009
Basket #2: Teppachi Morikago
In early June we started our second basket: the teppachi morikago (鉄鉢盛かご), also known as teppatsu morikago. Teppachi (or teppatsu) means "iron bowl." The name comes from the iron bowl that Buddhist monks carry to receive alms of food or money. A Google image search for 鉄鉢 shows there are a variety of dimensions and materials now associated with the word, from practically spherical bowls (including glass light fixtures!), to more squat, tray-like dishes of ceramic or lacquer. Two traits they all seem to have in common are: 1) they have soft, curved edges, and 2) the bowl's lip is slightly contracted, with the bowl's maximum circumference usually located closer to the lip than the bottom. Here's a fun image of a raccoon dog (tanuki; 狸) holding a teppachi.

 The center of the rinko-ami--what for now is just a big gaping hole--will become the bowl's bottom, so a seperate circular piece is needed to fill it and support the bowl's contents. In this case we use twill weave or plaiting called ajiro-ami.
  There is an infinite variety of patterns that can be made from ajiro-ami based on how strips of different widths and colors are distributed in the weave. For our teppachi, we used undyed strips that are all the same width (7.0 mm wide by 0.6 mm thick). It just so happened that some of the bamboo I was working with had a particularly strong green hue, so I was able to cross green strips with the more ordinary ivory-colored strips, making its concentric square pattern--called masu-ajiro (桝網代)--stand out even more.
 Once the strips are weaved and pressed together, a circle is drawn with a compass on the back. Wood glue is smeared along the line, enough so that once the circle is cut out its end pieces don't come undone.
Rinko Ami 輪弧編み

Teppachi morikago come in numerous sizes, all of which are made to such precise dimension standards that they nest inside one another like Russian dolls. We are making one of the medium sized bowls, which consists of 80 weaving strips (編みひご), 2.5 mm wide by 0.55 mm thick--half in width and slightly thinner than the higo we used for the mutsume morikago. In the first step, 40 higo are weaved together in what's called a rinko-ami ("wheel weave"); in this weave, each strip is layered above or below the previous strip (depending on whether your eye is moving clockwise or counter-clockwise), with all the strips interlocked in such a way that they stay together once the wheel is complete. The series is started by inserting higo one-by-one into a five-prong, makeshift tool so that each strip overlaps two other higo. Once a chain of 40 is made, the last five strips are inserted in place of the five prongs, which are then removed, completing the circle. I should note that not all rinko-ami consist of 40 higo and not all use a five-prong tool; these variables seem to change greatly depending on the desired diameter of the wheel, higo size and number, etc.  The completed wheel above is one we made for practice using 29 higo. In each teppachi bowl, two wheels are placed on top of each other and interlaced from the center outward, so the 29-higo wheels were important for learning the more complicated step of combining two wheels.
The completed wheel above is one we made for practice using 29 higo. In each teppachi bowl, two wheels are placed on top of each other and interlaced from the center outward, so the 29-higo wheels were important for learning the more complicated step of combining two wheels.Ajiro-ami 網代編み
 The center of the rinko-ami--what for now is just a big gaping hole--will become the bowl's bottom, so a seperate circular piece is needed to fill it and support the bowl's contents. In this case we use twill weave or plaiting called ajiro-ami.
  There is an infinite variety of patterns that can be made from ajiro-ami based on how strips of different widths and colors are distributed in the weave. For our teppachi, we used undyed strips that are all the same width (7.0 mm wide by 0.6 mm thick). It just so happened that some of the bamboo I was working with had a particularly strong green hue, so I was able to cross green strips with the more ordinary ivory-colored strips, making its concentric square pattern--called masu-ajiro (桝網代)--stand out even more.
 Once the strips are weaved and pressed together, a circle is drawn with a compass on the back. Wood glue is smeared along the line, enough so that once the circle is cut out its end pieces don't come undone.
 In the next post I'll show how the circle twill plaiting is inserted between two wheels and how the wheels are interwoven as they climb up the walls of the bowl.
Mutsume Morikago Part 3: Final Steps
It's taken me several weeks to finally put together the last post for this basket. Sorry to keep you waiting. While I've been busy showing Caitlyn's family around Oita and taking care of other odds and ends, nearly five weeks have flown by. During those weeks we managed to finish the mutsume basket, and, as of Friday, nearly bring the second basket on our agenda to completion. I have a lot of catching up to do.
So, back to the mutsume morikago. With the masa and inner and outer rims firmly fastened with wire, it was now time to secure the entire set with a long strand of thin rattan cane.
.jpg) Yamato Musubi 大和結び
Yamato Musubi 大和結びThe rattan we tainees use is purchased by the kilogram unit and comes from Indonesia. It's expensive--about 200 dollars per kilogram when bought as a bundle of thin cane like in the picture. We processed the rattan the same way we do bamboo higo in the latter steps, first by running it between two blades to make it an even width of 2.0 mm (a process called haba-tori, 幅取り), and then running it through a plane-like tool (called urasuki-sen, うらすき銑) to bring it to an even thickness of 0.6 mm. Easier said than done. This was my first encouter with rattan as a raw, workable material rather than as a finished product, like a chair, and it was endlessly frustrating. It's so soft compared to bamboo that attempting to shave off too much at one time runs the blade entirely through the cane, severing it--a mistake I made about 10 or 15 times. When shaving bamboo higo to a certain thickness, we try to find the sharpest part on the urasuki blade; with rattan we had to search for the dullest part, and lower the cutting angle, because it's so soft.
Rattan is probably used in basket making if for no simpler reason than that it is more flexible and less prone to cracking or breaking than bamboo when wound tightly. Brought to the dimensions of 2.0 by 0.6 mm, it really feels like soft leather string, or some synthetic material--but unlike either of these, less dependable. I found this out when tying my baskets with it. The knots in this basket are called yamato-musubi (大和結び), yamato being an ancient word for "Japan." Just as with bamboo, we wet the rattan first to make it even more flexible and to keep it from snapping when tying the knots. For me, this was the most difficult step in the entire basket. Pulling too hard when finishing each knot makes the rattan snap, and not pulling it hard enough produces a loose knot, which in this case is more worrisome aesthetically than technically because there are enough knots on the entire rim to keep it in place. Hoping to make beautifully snug nots, I must have snapped the rattan about 10 or so times, each time requiring a special grafting knot that takes even more time to complete. I had to keep telling myself that it's in fact a plant.
 Outer rim ↑ Inner rim ↓
 About 2.5 meters of rattan was used to tie the entire circumference. When everything goes well and the rattan doesn't snap it works it's way around the basket continuously, stopping at every other hexagon to wind around the rim twice, pass through a few of it's own loops, and move on. About 10 cm of end left from the first knot is met with the last knot and looped through to give it a truly continuous appearance. When finished tying the rattan, all the metal wires are snipped off. Another challenging part worth noting: when tied well, the two strands on the inner side lie parallel to each other and don't cross (in this case, the right knot is dangerously close to crossing and not as visually pleasing).
 Ikada-dake 筏竹
Now virtually finished, the only thing missing in this basket is some support for its bottom end. With the hexagonal weaving left alone, you can probably imagine it's a bit too weak to maintain a clean shape over the long-term if made to contain, say, apples or other heavy fruit. To solve this problem, ikada-dake ("raft bamboo") are used.
.jpg)
.jpg)
Top view (before) ↑ Top view (after) ↑ Bottom view (after) ↓
 Technically, this step is simple and doesn't require much explanation. Bamboo strips measuring 14.5 mm wide by 1.8 mm thick are cut to form a perfect, larger hexagon and then woven into the basket's hexagonal latticework. As in many Beppu bamboo craft items, form is prioritized alongside function, so the problem of which strips go over and which go under the ikada-dake is handled with special care, and produces a series of concentric diamonds on both sides. It's this aspect of basket making that gets the wheels in my mind spinning when I think about designing my own baskets in the future.
 Saturday, May 30, 2009
大分合同新聞の記事 Article in the Oita Godo Shimbun Newspaper
5月17日(日)朝刊の大分合同新聞に載った記事。写真をクリックすると、拡大され、読めるようになる。ネット上の大分合同新聞にも記事がアップされているので、どちらでも読める。
This is the article that appeared in the May 17th (Sunday) morning edition of the Oita Godo Shimbun, a local newpaper that covers news in the Oita prefecture area. You can look at the article more closely by clicking on the picture. There is also a copy of the article, including a color photo, on Oita Godo's webpage. A translation of the article is available below.
.jpg)
Prisoner of Bamboo Crafts
Mr. Jensen, former Coordinator for International Relations
First Foreigner at Beppu’s Training Center
Oita Godo Shimbun (Morning Edition), Sunday, May 17, 2009
------------------------------------
Former Coordinator for International Relations and American native Stephen Jensen (Jonan Higashi-machi, Oita City) has been studying bamboo crafts at the Oita Prefecture Bamboo Craft and Training Support Center since April. This is the first time a foreigner has been admitted to the Center. He said enthusiastically, “I want to make all kinds of baskets. I need to work hard to get to that level.”
Mr. Jensen came to Oita Prefecture in August, 2006, and worked as an international relations coordinator until last summer. He is also a member of Sodokai, a drawing and painting group in Beppu City. Capturing bamboo as a subject for his paintings, he felt drawn to bamboo since his arrival to Japan, he says.
In October last year, students from Malaysia visited Beppu to study bamboo crafts. While working as an interpreter, Mr. Jensen watched bamboo being weaved from close up, which spurred his desire to come in touch with one of Japan’s traditional arts.
In the United States, “bamboo culture” is virtually nonexistent; it occupies little presence beyond its display as artwork in galleries. “I eventually hope to become a bridge—to help introduce Beppu’s bamboo crafts to Americans and deepen their understanding of it.”
Mr. Jensen will work for one year acquiring the basic techniques and production skills. “The most captivating thing about bamboo is its versatility. I see value in both purely aesthetic and utilitarian baskets. For now, I want to experiment with making different types.”
Trainees are currently working on making higo, the step before weaving when bamboo materials are shaped. It’s the foundation for all bamboo crafts, but keeping thickness consistent has been difficult. “Although, I have the hardest time getting used to sitting in seiza. My legs fall right to sleep.”
Shigeru Tamura, director of the Center, expressed his own expectations. “He’s been working diligently. I hope he’ll become a craftsman and carry on Beppu’s tradition.”
--------
Photo caption: Stephen Jensen, who was admitted to the Center’s Bamboo Crafts Department in April this year. “I want to try making all kinds of baskets,” he says enthusiastically.
Saturday, May 23, 2009
OBSラジオ「朝感」取材の報告 Live interview with OBS radio station
今週の木曜日の朝、OBSラジオの荒金由希子さんがトピッカーで訓練校に取材にやってきた。打ち合わせをしてから、約4分間のインタビューに入った。生放送ということでちょっと緊張していたけど、自分の竹工芸訓練についての思いを存分に語れることが嬉しかった。話し合った詳細な内容はここでは紹介できないんだけど、大分に来たきっかけは何だったのか、どうして竹工芸訓練支援センターに入ろうと思ったのか、入って一番苦労していることは何か、卒業したらどうするか、アメリカには竹工芸はあるのか、というのが大体の流れだった。トピブロ(トピッカーのブログ)にも、私と荒金さんとの写真や、このブログへのリンクも載っているから、是非ご一読を。
先週の日曜日朝刊の大分合同新聞(11面)にも私が初の外国人として入校したことが大きく取り上げられた(それについては近々別のポストに書くつもり)。こうやって私の入校がたくさんの人に注目されるのはすごく嬉しくて、この取材ぶり(?)も大変有難い。が、毎日の訓練においては、他の18人の訓練生もみんな一生懸命がんばっている事をお忘れなく。竹に惹かれて、遠い県外から引っ越してきている方も多数いるから、「外」という意味では一緒だと思う。故郷が国内の地方であれ、別の国であれ、竹という自然素材にぶつかりながら仲良くなり、丁寧な指導を授かりながら一緒に勉強していくという意味ではみんな基本的に同じではないだろうか?うまく言えたか分からないけど、これは私の勝手な考え。
とにかく、インタビューの機会を与えてくれたOBSラジオ、インタビューの要請に応じた竹工芸訓練支援センターの所長や先生達、こんな騒ぎで私が迷惑を掛けている訓練生たち、の皆さんへ感謝の意を表したい。
On Thursday morning this week, Yukiko Arakane from OBS (Oita Broadcasting System) radio came to the Center to interview me. Around 9:00, I was called to the director's office for a prelimary discussion, followed by a 4-minute interview that was broadcasted live on OBS radio's Chokan (朝感) show around 9:30. (Chokan, by the way, is a play on words; it's a homophone to 朝刊, meaning "morning edition," but the show's name means "morning feelings" or "morning impressions.") It was a relatively short interview so we couldn't fit much in, but the general flow of questions went like this: what brought me to Oita in the first place, why I applied to the school, what I am struggling with most at school now, what I'll do after I graduate, and whether there are any bamboo crafts in the US. They also put up a picture and a blurb from the interview on their blog. Notice in the photo we're holding the mutsume morikago that we trainees are currently working on (I'm holding the model; Arakane-san is holding one I'm half finished). I'll translate the article for you here:
From America...
Topic Car blog, May 21, 2009 (Thursday)
Stephen, from America, was admitted to the Oita Prefecture Bamboo Craft Training and Support Center (Beppu City). Stephen became interested in bamboo crafts when he saw bamboo material being processed. Learning bamboo crafts is fun, but it's painful sitting on the wooden floor, he says. He spoke energetically about how he wants to continue working in bamboo crafts even after completing the one-year program. We all hope he'll help spread bamboo crafts in America. Everyone, please check out Stephen's blog too.
Thursday, May 21, 2009
Mutsume Morikago: Part 2
.jpg) Allow me catch you up on what we've been working on in the last two weeks. After weaving the bottom of the mutsume morikago, we erected the six sides and continued the same weave using four more horizontal higo (called mawashi-higo, 回しヒゴ;
Allow me catch you up on what we've been working on in the last two weeks. After weaving the bottom of the mutsume morikago, we erected the six sides and continued the same weave using four more horizontal higo (called mawashi-higo, 回しヒゴ;.jpg) meaning "circular higo"), being careful to keep all the holes on each row perfect hexagons. Once the top mawashi-higo was in place we bent all vertical higo located on the outside inward; this secures the top mawashi-higo and finishes the weave. This entire process is done with three relatively thick prong-like pieces (kari-chikara-dake ; 仮力竹; "temporary strength bamboo") inserted in the bottom, used to keep the basket from losing its shape.
meaning "circular higo"), being careful to keep all the holes on each row perfect hexagons. Once the top mawashi-higo was in place we bent all vertical higo located on the outside inward; this secures the top mawashi-higo and finishes the weave. This entire process is done with three relatively thick prong-like pieces (kari-chikara-dake ; 仮力竹; "temporary strength bamboo") inserted in the bottom, used to keep the basket from losing its shape.From there we moved on to fashioning the parts that would make up the basket's rim. There are three: the outer rim (soto-buchi; 外縁), inner rim (uchi-buchi; 内縁) and a filler piece that fits flushly between the outer and inner rims and hides the end of the higo weaving underneath (masa; 柾) (any one know the technical term for this piece?).
.jpg) The inner and outer rims we made in the same way as higo, but these were much thicker pieces--2.0 and 2.5 mm--so when it came time to bend them we used what they call a heating jig (himage-jigu, 火曲げ治具). It's basically a tiered, hollow metal tower under whicih a burner is lit. Bamboo apparently bends more easily when it is heated and retains its shape well after it cools, so this seems to be the method of choice for bending thicker bamboo into perfect circles or semi-circles. Our instructor said that back when this contraption wasn't used craftsmen would bend the bamboo around their knee and rub it back and forth to create heat through friction, thus making it more pliable. Still, it would be difficult to bend it into a perfect circle through such a process. I can't imagine how difficult the task was back then. I finished bending all ten of my rims in about 30 minutes.
The inner and outer rims we made in the same way as higo, but these were much thicker pieces--2.0 and 2.5 mm--so when it came time to bend them we used what they call a heating jig (himage-jigu, 火曲げ治具). It's basically a tiered, hollow metal tower under whicih a burner is lit. Bamboo apparently bends more easily when it is heated and retains its shape well after it cools, so this seems to be the method of choice for bending thicker bamboo into perfect circles or semi-circles. Our instructor said that back when this contraption wasn't used craftsmen would bend the bamboo around their knee and rub it back and forth to create heat through friction, thus making it more pliable. Still, it would be difficult to bend it into a perfect circle through such a process. I can't imagine how difficult the task was back then. I finished bending all ten of my rims in about 30 minutes. .jpg)
After molding the rims, the ends of each rim were cut to match the exact circumference of the basket. Next, 7 cm of each end were shaved away so the two ends could overlap each other, forming a closed circle. Both outer and inner rims were adjusted this way, but only the outer rims were glued shut; the outer rim decides the absolute circumference of the basket's rim, while the inner rim is made to expand freely to fit the outer rim. The rims are then clipped temporarily onto the basket so the masa can later be inserted between them.
.jpg) The masa is fashioned like a higo, but made to be thick so it fills the groove between the two rims. The masa's skin is placed on the outside to match the rims, and it's split down the middle to help make it fit smoothly along the entire circumference. The picture above shows the outer and inner rims clipped temporarily, and the picture below shows the masa fit snuggly between them, this time secured by wire twisted tightly around all three. Notice the two bumps; this is the bamboo's joint. They become staggered because of the difference their circumferences.
The masa is fashioned like a higo, but made to be thick so it fills the groove between the two rims. The masa's skin is placed on the outside to match the rims, and it's split down the middle to help make it fit smoothly along the entire circumference. The picture above shows the outer and inner rims clipped temporarily, and the picture below shows the masa fit snuggly between them, this time secured by wire twisted tightly around all three. Notice the two bumps; this is the bamboo's joint. They become staggered because of the difference their circumferences..jpg)
Subscribe to:
Comments (Atom)


.jpg)